The definitive guide to MIDI IN with Raspberry Pi's GPIO
Do we need a USB MIDI interface to use MIDI with the Raspberry Pi? No!
Is it possible to have MIDI IN into Raspberry Pi's GPIO? Yes!

After all, MIDI is nothing else than serial connection at 31250 baud, so let's use the Pi's serial port.
Here is a working solution:
-
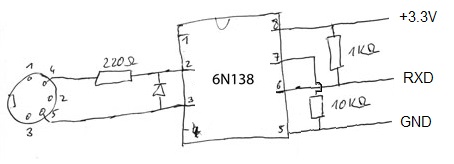
Build this cicuit (you need a 6N138 optoisolator, a few resistors, and a diode 1N4148):

-
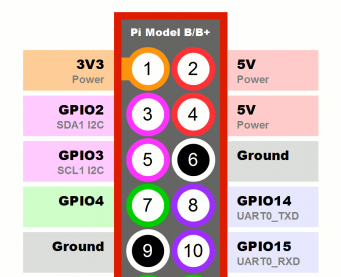
Connect GND to a GPIO pin #6, connect +3.3V to a GPIO pin #1, connect RXD to the GPIO pin #10!

-
Check your Linux kernel version with
uname -a. If it's 4.5 or higher, just add these three lines at the end of/boot/config.txtand go to step 4.enable_uart=1 dtoverlay=pi3-miniuart-bt dtoverlay=midi-uart0(
pi3-miniuart-btdisables the Bluetooth and changes the connection of GPIO pins #14 #15, see here)If you have an older version of Linux kernel (4.4 or lower), you have to add
bcm2708.uart_clock=3000000at the end of/boot/cmdline.txt, remove everything in this file related to ttyAMA0 (it would pollute the serial port input with console text), and add this at the end of/boot/config.txt:init_uart_clock=2441406 init_uart_baud=38400It's a hack (but it perfectly works!) allowing the Pi's serial port to run at 31250 baud, which would normally not be possible with UART clock of 3Mhz.
-
Reboot and run this Python code:
import serial ser = serial.Serial('/dev/ttyAMA0', baudrate=38400) message = [0, 0, 0] while True: i = 0 while i < 3: data = ord(ser.read(1)) # read a byte if data >> 7 != 0: i = 0 # status byte! this is the beginning of a midi message! message[i] = data i += 1 if i == 2 and message[0] >> 4 == 12: # program change: don't wait for a message[2] = 0 # third byte: it has only 2 bytes i = 3 messagetype = message[0] >> 4 messagechannel = (message[0] & 15) + 1 note = message[1] if len(message) > 1 else None velocity = message[2] if len(message) > 2 else None if messagetype == 9: # Note on print 'Note on' elif messagetype == 8: # Note off print 'Note off' elif messagetype == 12: # Program change print 'Program change' - That's it!
`
Note: the method described here is nothing really new. It's just the sum of various (sometimes difficult to find) informations found in lots of places over the internet, and some personal hacks (the Python code) to make it easy to use.
Note2: thanks to Damien for pointing the new method for Linux kernel >= 4.5.